
Creating Custom Cadences
Note: Cadences is a feature of Signal by EverTrue. If you have questions about Signal, please reach out to your Customer Success Manager (CSM).
Signal Cadences includes the ability to create custom cadences that fit your organization’s unique needs! With this feature, you can create tailored cadences that target specific prospect segments, focus outreach around on-campus events, and more. Custom Cadences ensure your outreach strategies are as unique as your organization's mission!
Your role in EverTrue will determine where you can create custom cadences:
- EverTrue Owners with Admin Permissions: Build custom cadences from Signal’s Cadences tab, or in EverTrue’s Data Manager.
- EverTrue Users: Build custom cadences from Signal’s Cadences tab.
Below, we’ll take a look at how to create custom cadences as both an EverTrue User and EverTrue Owner. Let’s dive in!
Note: If you are an EverTrue Owner, be sure to add cadence categories for your organization to ensure your team can start creating custom cadences!
Creating a Cadence as a User
No matter your role in EverTrue, you can create custom cadences directly from your Cadences tab. This is the primary location for EverTrue Users to build cadences. EverTrue Owners with admin permissions can also create cadences from our Data Manager, and we’ll cover how to take this action from this location further below in the article.
Let’s get started with building a cadence!
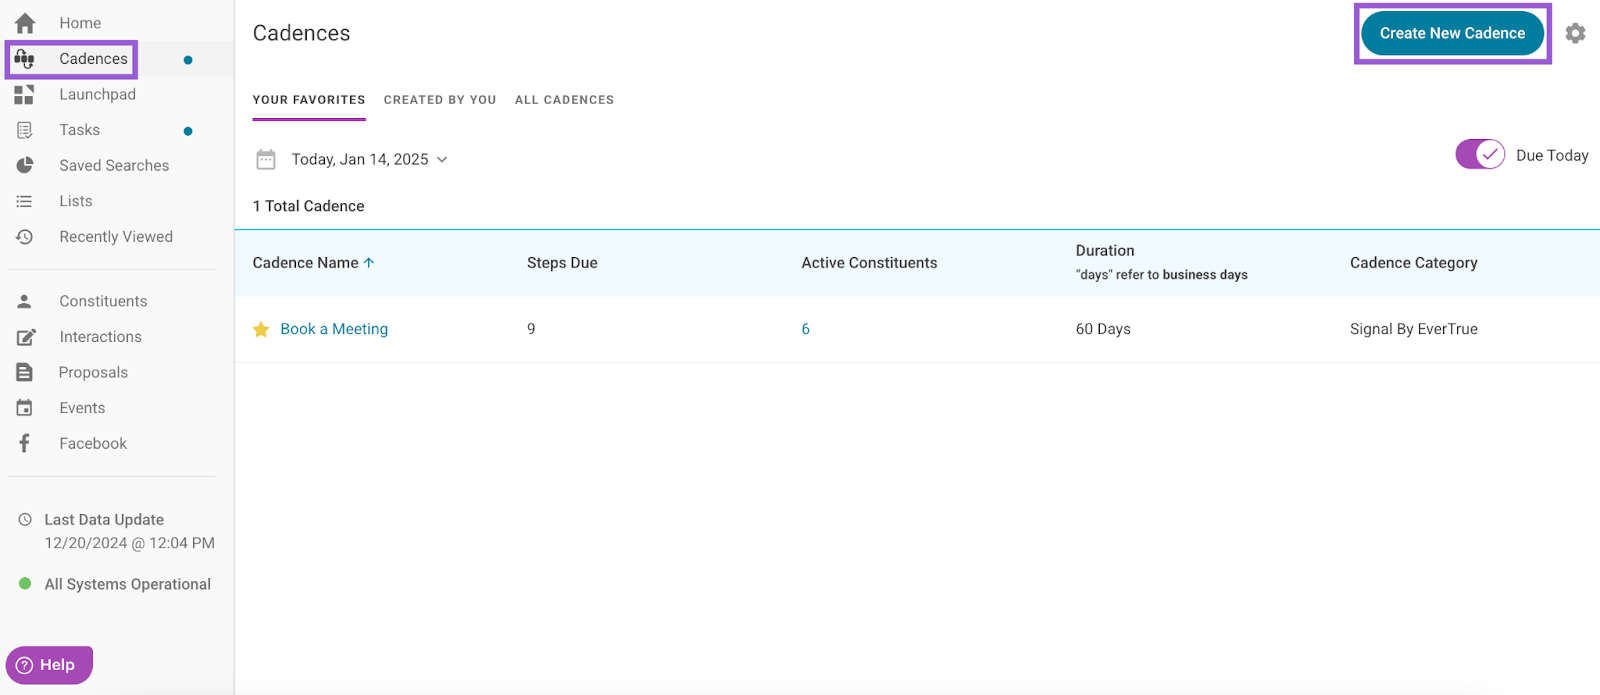
Step 1. Click the Add Cadence Button
To create a new cadence, navigate to your Cadences tab and click Create New Cadence in the upper-right corner.
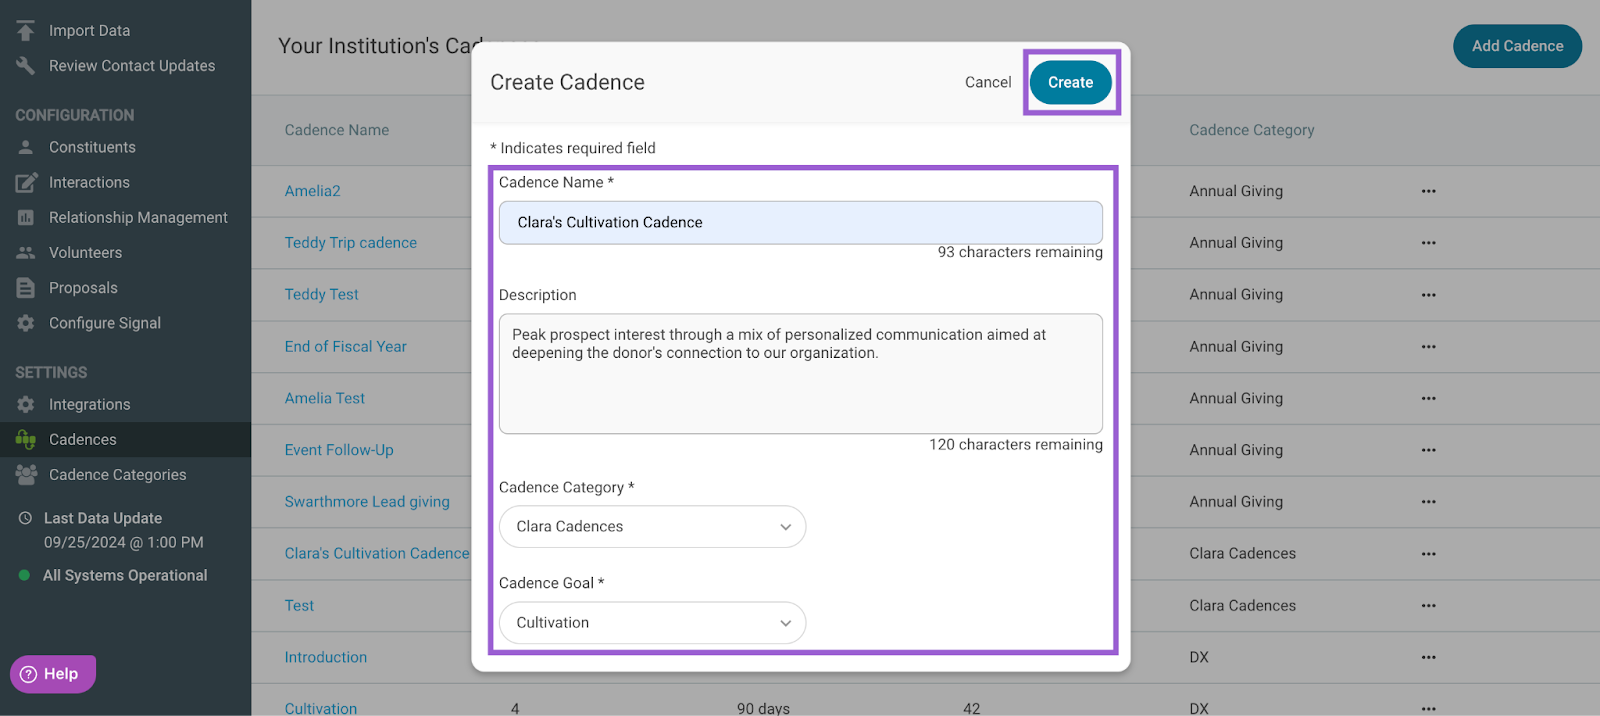
Step 2. Input and Save Cadence Details
A Create Cadence popup will appear where you can enter the following details:
- Cadence Name (REQUIRED): Use this field to add a title to your cadence. Titles are limited to 120 characters.
- Description: Use this field to add details about the cadence. When added, this appears at the top of an open cadence. Descriptions are limited to 250 characters.
- Cadence Category (REQUIRED): Use this dropdown to select the category for your cadence. Options include categories you’ve been added to by an EverTrue Owner.
- Cadence Goal (REQUIRED): Use this dropdown to specify the intended outcome for the cadence. Other, Qualification, Cultivation, Solicitation, and Stewardship are available options. This selection helps inform the data powering certain aspects of your Signal Clarity Dashboards. We’ll go into more detail on available goals next!

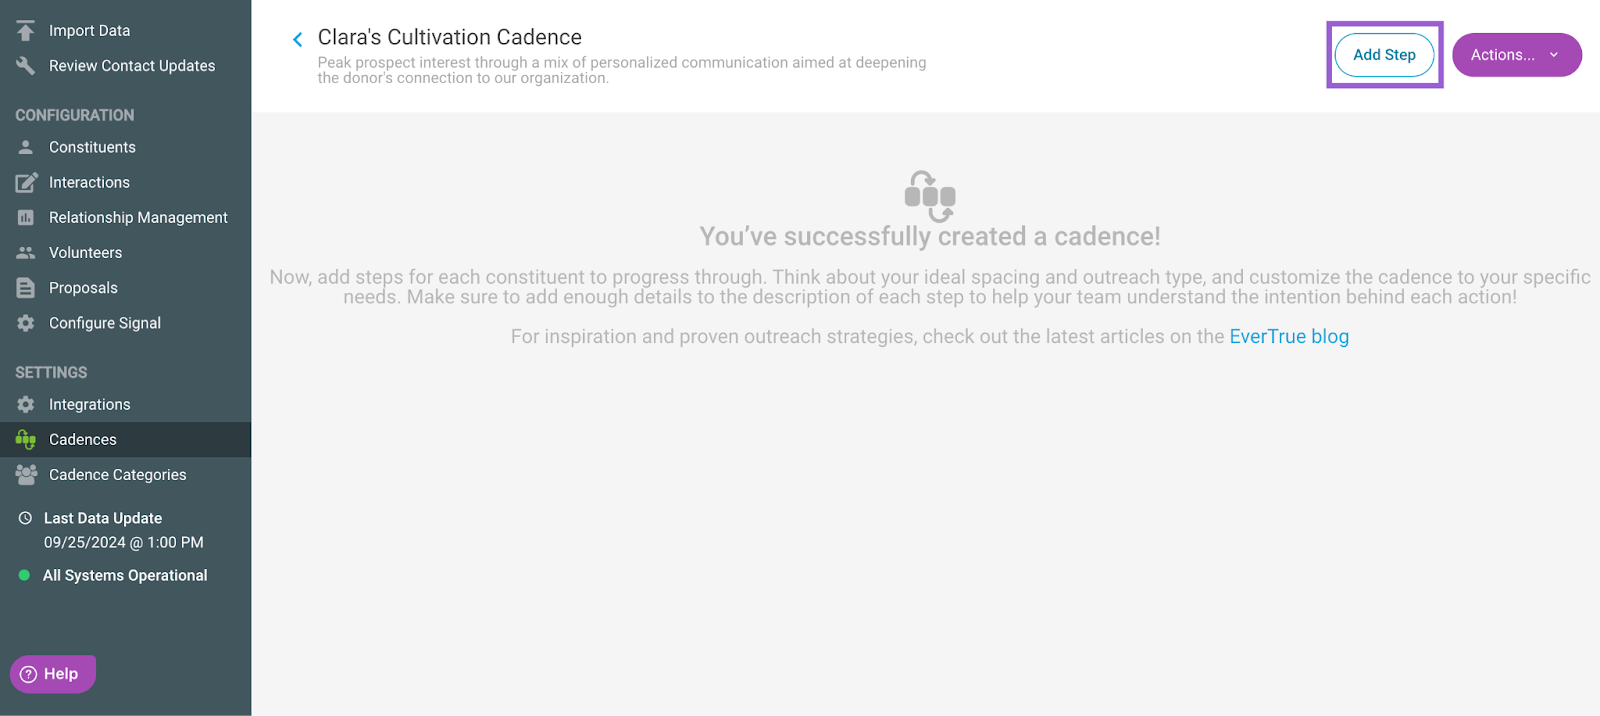
Click Create to finish adding the cadence! You’ll be redirected to your newly-created cadence, where you can start adding steps.
Once created, the cadence will appear in the Created By You table within your Cadences tab.
Step 2a. Review Cadence Goals
While your team may have its own definitions for each available cadence goal, we’ve provided our general descriptions below for reference.
- Qualification: These cadences are aimed at identifying which prospects are most likely to engage and become donors, ensuring that time and resources are focused on those with the highest potential for contribution.
- Cultivation: These cadences are focused on building strong relationships with prospects before making a donation request. The relationship-building process is crucial for fostering trust, aligning the donor’s interests with your organization’s mission, and ensuring that the prospect feels engaged and valued.
- Solicitation: These cadences are aimed at converting the relationships and interest built during Cultivation and Qualification cadences into a financial contribution, often by presenting clear and compelling cases for support through personalized appeals.
- Stewardship: These cadences are focused on nurturing and maintaining relationships with donors after they have made a contribution. They often involve expressing gratitude, demonstrating the impact of the donor’s gift, and keeping donors engaged with your organization in preparation for future asks.
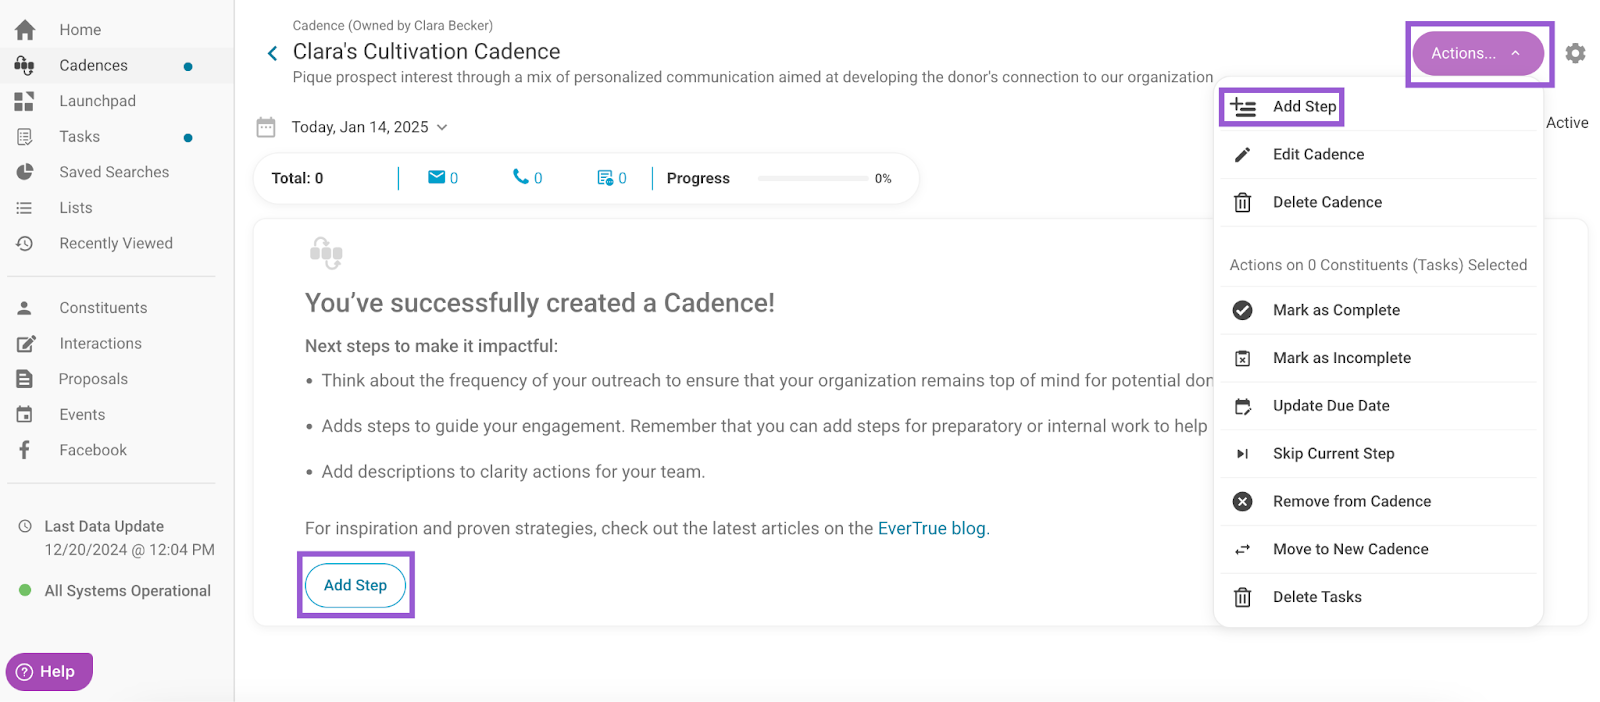
Step 3. Click the Add Step Button
You’re ready to start building your cadence steps! As you add steps, consider how you want constituents to progress through the cadence. Be mindful of things like the number of days spaced between steps, and the outreach method you want to employ. Each step can be tailored to suit your specific needs!
To add a step, click the Add Step button in your empty cadence page. If the cadence already has steps, this button appears beneath the last step and can also be accessed via the Actions dropdown in the upper-right corner!
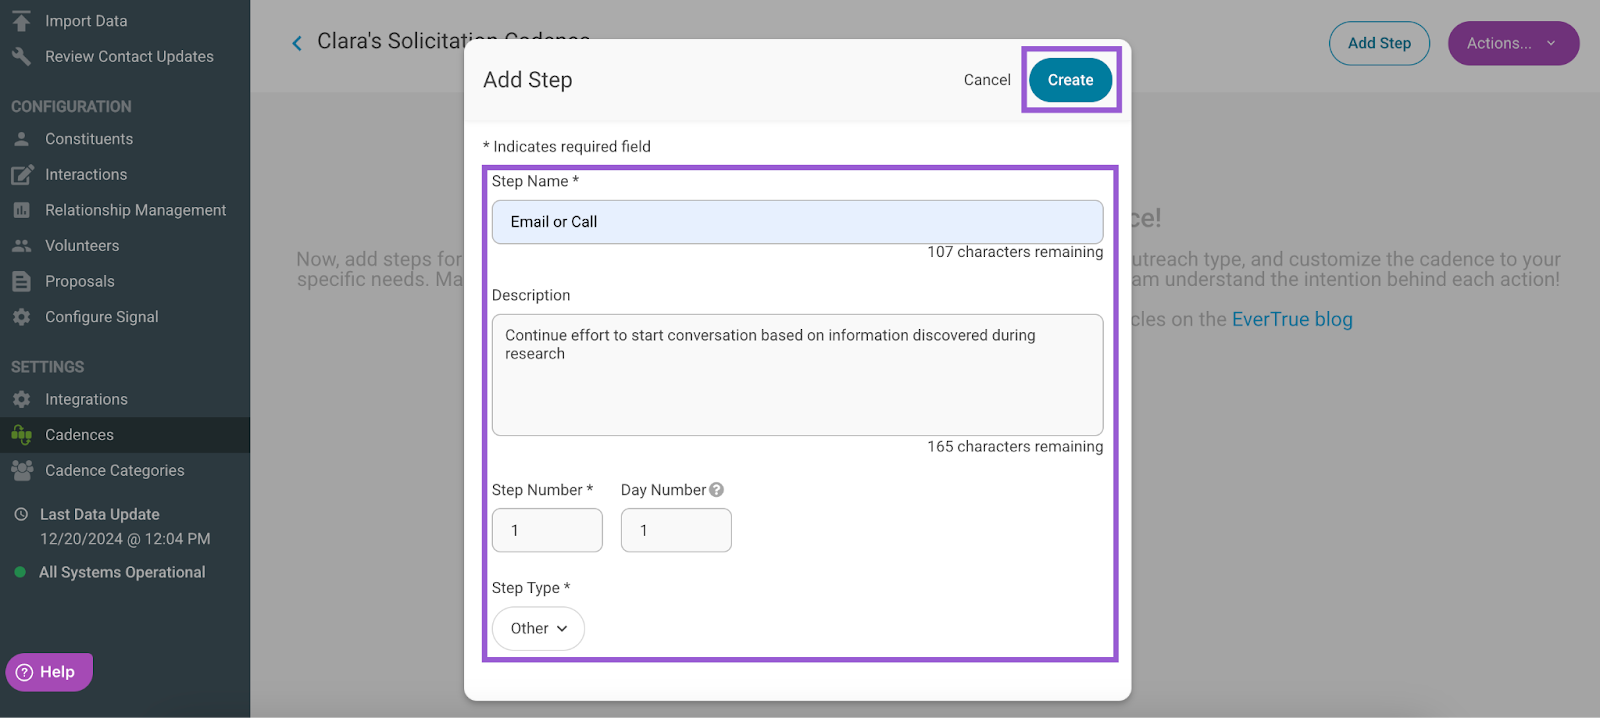
Step 4. Input and Save Cadence Step Details
An Add Step popup will appear where you can enter the following details:
- Step Name (REQUIRED): Use this field to add a title to your step. Titles are limited to 120 characters.
- Description: Use this field to add details about the step. When added, this is found in the step’s tooltip—simply hover over the info icon next to the step name to view it! Descriptions are limited to 250 characters.
- Step Number (REQUIRED): Use this field to specify the order of the step. This step number pre-populates based on the number of steps you’ve already added to the cadence, but you can adjust it as needed. Step numbers must be greater than 0.
- Day Number (REQUIRED): Use this field to specify the day you want the step to occur. Day numbers must be greater than 0.
- Step Type (REQUIRED): Use this dropdown to specify the type of action you want to associate with the step. Call, Email, LinkedIn, Research, Print Mail (e.g., Pledgemine, other), Text, ThankView, and Other are available options.
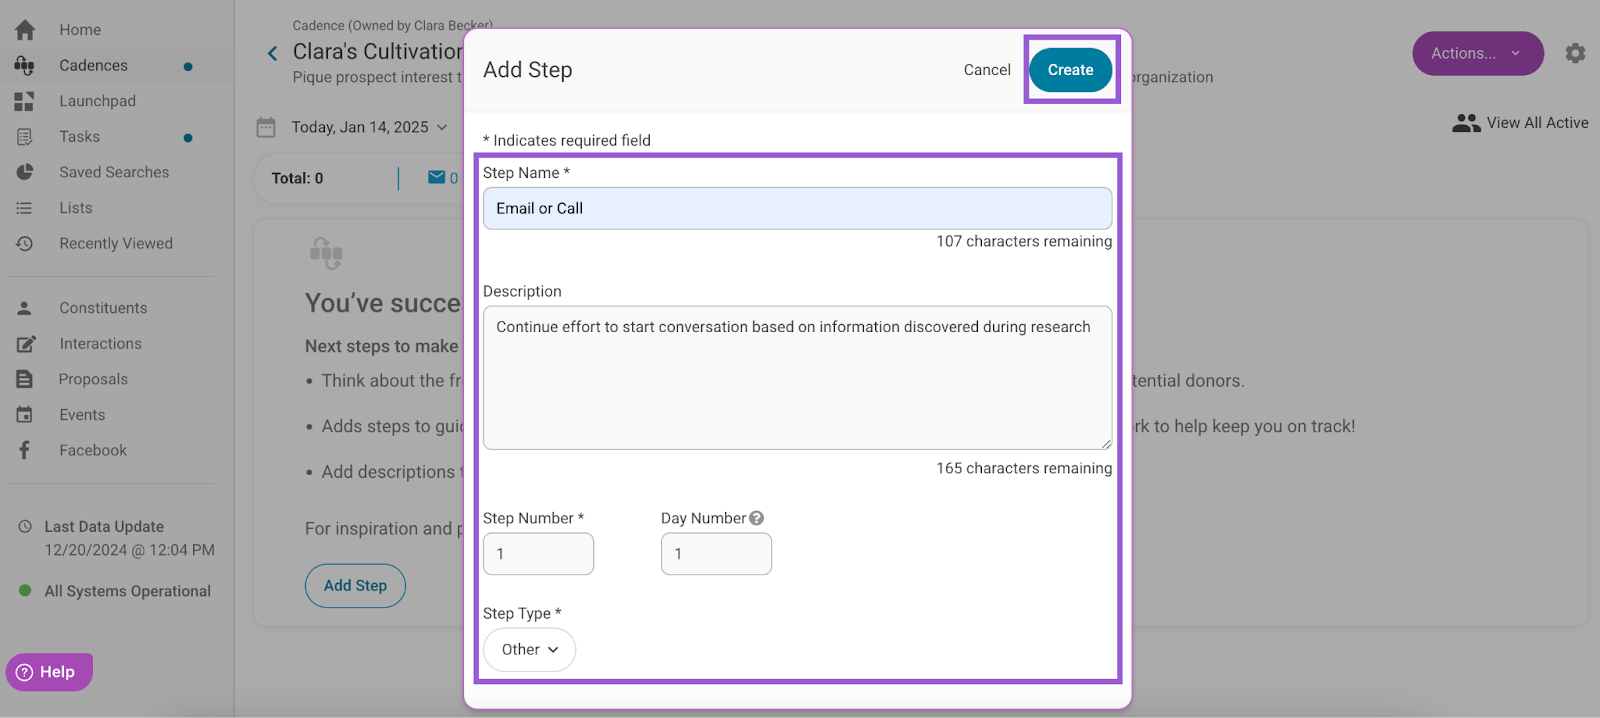
Click Create to finish adding the step! Your new step will appear in the open cadence, and you can continue adding any remaining steps.
If you need to make changes to your cadence or its steps and aren’t sure where to start, check out our dedicated article, Modifying Custom Cadences!
Creating a Cadence as an Owner
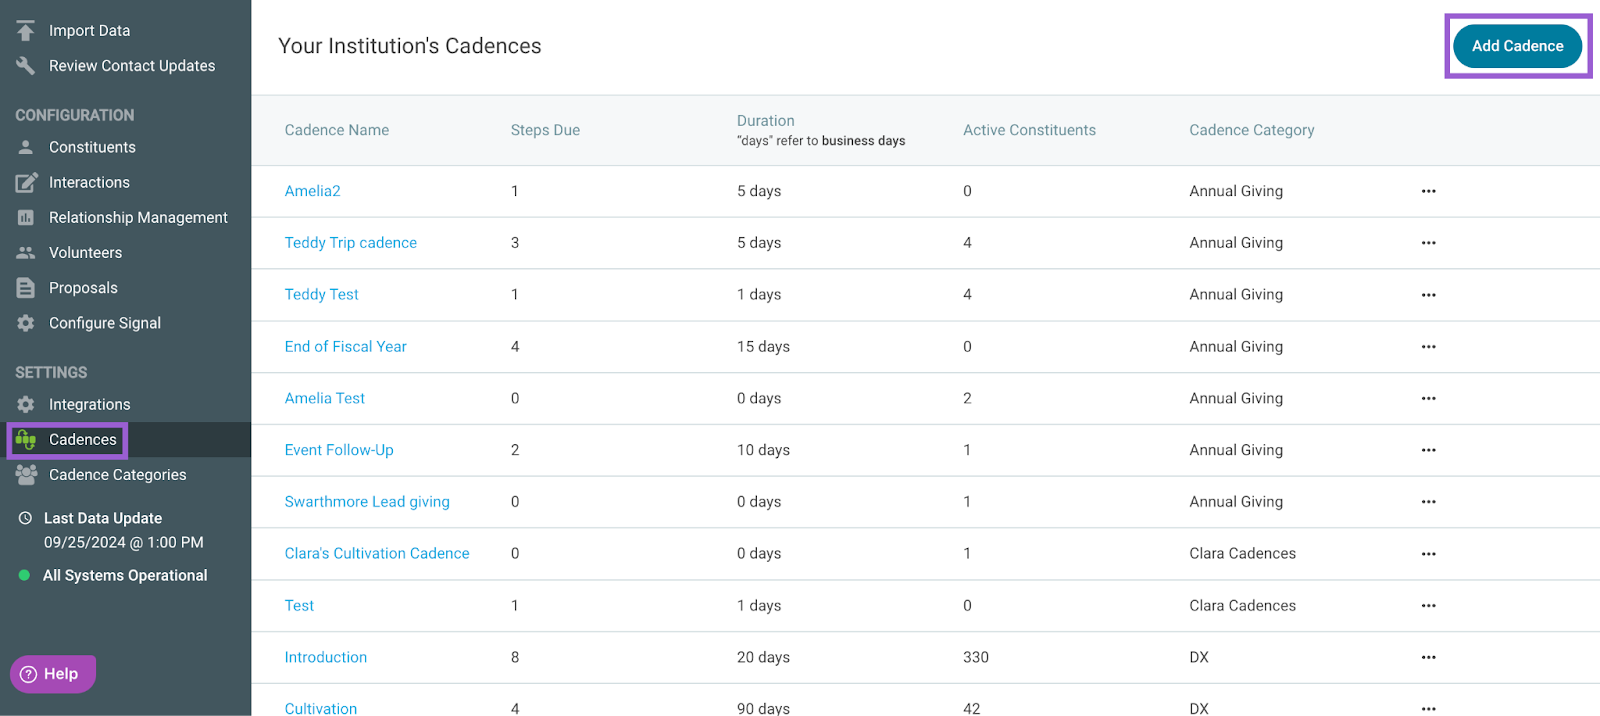
If you are an EverTrue Owner with admin permissions, you also have the ability to create custom cadences from the Cadences tab in Data Manager! Below, we’ll guide you through the steps for creating cadences from this secondary location.
Step 1. Click the Add Cadence Button
To create a new cadence, navigate to your Cadences tab and click Add Cadence in the upper-right corner.
Step 2. Input and Save Cadence Details
A Create Cadence popup will appear where you can enter the following details:
- Cadence Name (REQUIRED): Use this field to add a title to your cadence. Titles are limited to 120 characters.
- Description: Use this field to add details about the cadence. When added, this appears at the top of an open cadence. Descriptions are limited to 250 characters.
- Cadence Category (REQUIRED): Use this dropdown to select the category for your cadence. Options include all categories available to your organization. Take a look at our Creating Cadence Categories article if you need to make a new category!
- Cadence Goal (REQUIRED): Use this dropdown to specify the intended outcome for the cadence. Other, Qualification, Cultivation, Solicitation, and Stewardship are available options. This selection helps inform the data powering certain aspects of your Signal Clarity Dashboards. For additional detail, review our goal descriptions!
Click Create to finish adding the cadence! You’ll be redirected to your newly-created cadence, where you can begin adding steps.
Once created, the cadence will also appear in the Created By You table within Signal's Cadences tab.
Step 3. Click the Add Step Button
To add a step, click the Add Step button in the upper-right corner of your open cadence.
Step 4. Input and Save Cadence Step Details
An Add Step popup will appear where you can enter the following details:
- Step Name (REQUIRED): Use this field to add a title to your step. Titles are limited to 120 characters.
- Description: Use this field to add details about the step. When added, this is found beneath the step’s title. Descriptions are limited to 250 characters.
- Step Number (REQUIRED): Use this field to specify the order of the step. This step number pre-populates based on the number of steps you’ve already added to the cadence, but you can adjust it as needed! Step numbers must be greater than 0.
- Day Number (REQUIRED): Use this field to specify the day you want the step to occur. Day numbers must be greater than 0.
- Step Type (REQUIRED): Use this dropdown to specify the type of action you want to associate with the step. Call, Email, LinkedIn, Research, Print Mail (e.g., Pledgemine, other), Text, ThankView, and Other are available options.
Click Create to finish adding the step! Your new step will appear in the open cadence, and you can continue adding any remaining steps.
If you need to make changes to your organization’s cadences, and aren’t sure where to start, check out our dedicated article, Modifying Custom Cadences!
For any other questions, reach out to EverTrue Support at genius@evertrue.com.
Content aside
-
1
Likes
- 1 yr agoLast active
- 445Views
-
2
Following