
Using Collaborative Tasks on Your iOS App
Note: Collaborative Tasks is a feature of Signal by EverTrue. If you have questions about Signal, please reach out to your Customer Success Manager (CSM).
What is Signal Collaborative Tasks?
Signal Collaborative Tasks on iOS allows you to create and track tasks while on the go. Think of it as your digitized prospecting and segmenting to-do list! This feature provides a dedicated space for managing post-meeting work, making it easier than ever to build and maintain relationships with prospective donors.
With Collaborative Tasks, you can link tasks to constituents and assign them to team members. If your team uses EverTrue’s AI features, you can also add recommended to-dos with AI-Suggested Tasks!
Below, we will explore how to use Collaborative Tasks on your iOS app. Let’s get started!
Adding Tasks in the Tasks Page
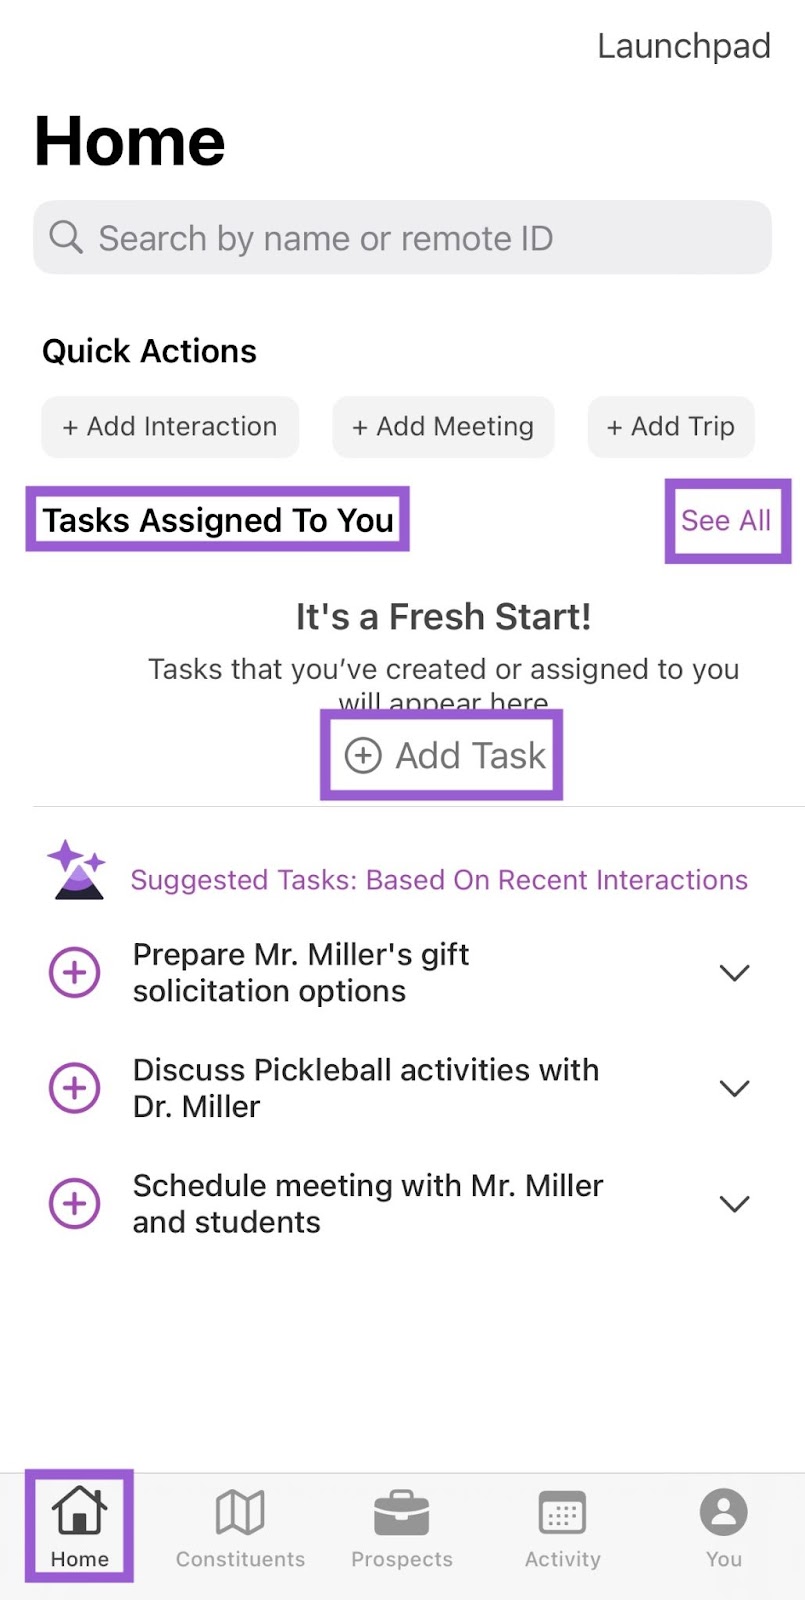
Step 1. Tap See All in Your Your Home Tab
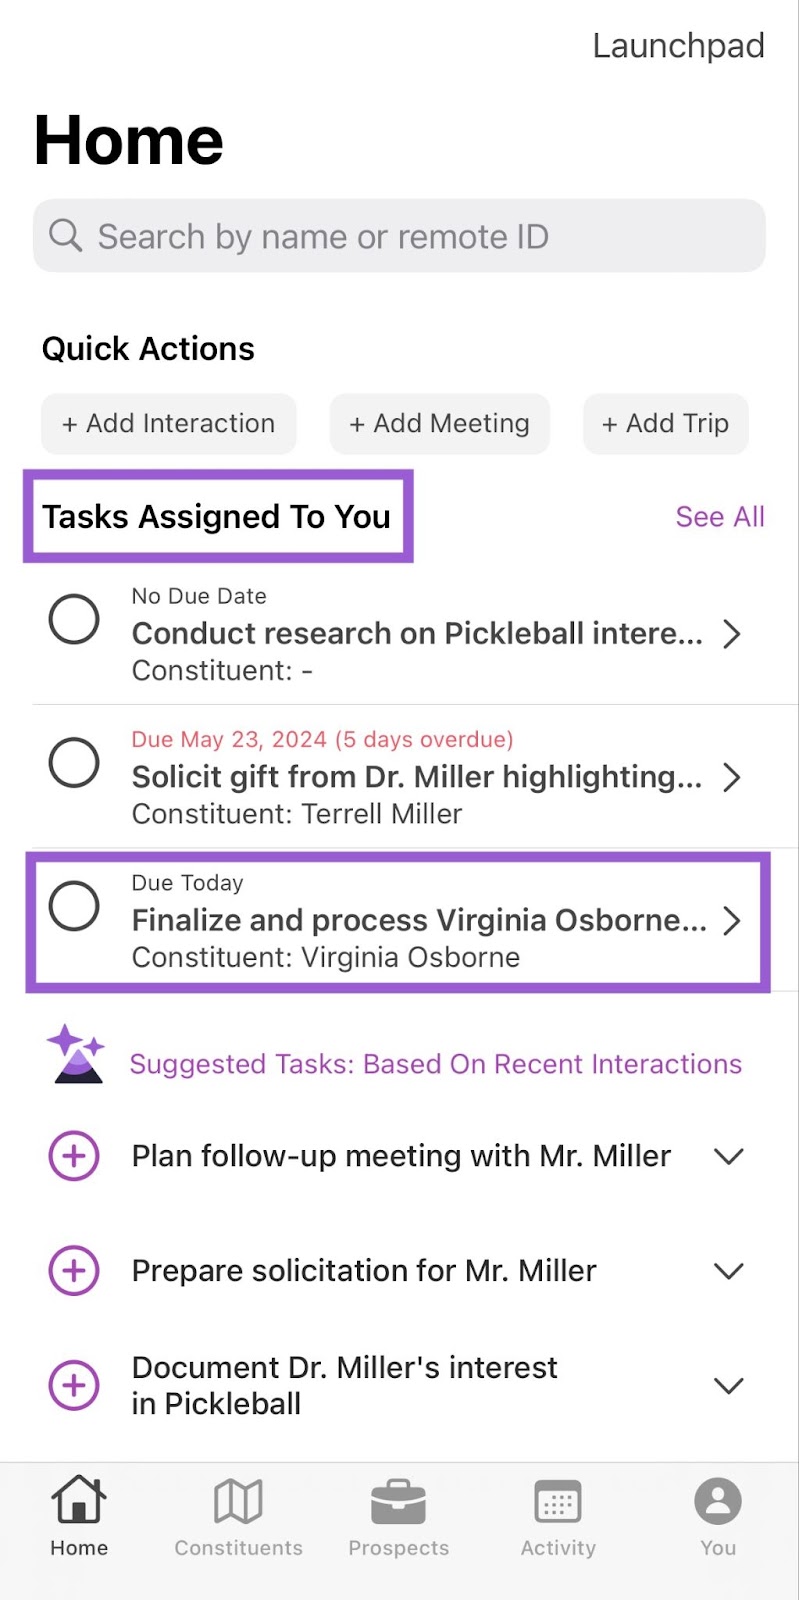
To create a new task, navigate to your Home tab and scroll to the Tasks Assigned To You section.
If you don’t yet have any assigned tasks, a + Add Task button appears in the middle of this section. Though you can use this button to add tasks, we’ll focus on adding tasks when you already have at least one. Tap See All in the upper-right corner of this section to access your Tasks page—the primary location where you can add tasks.
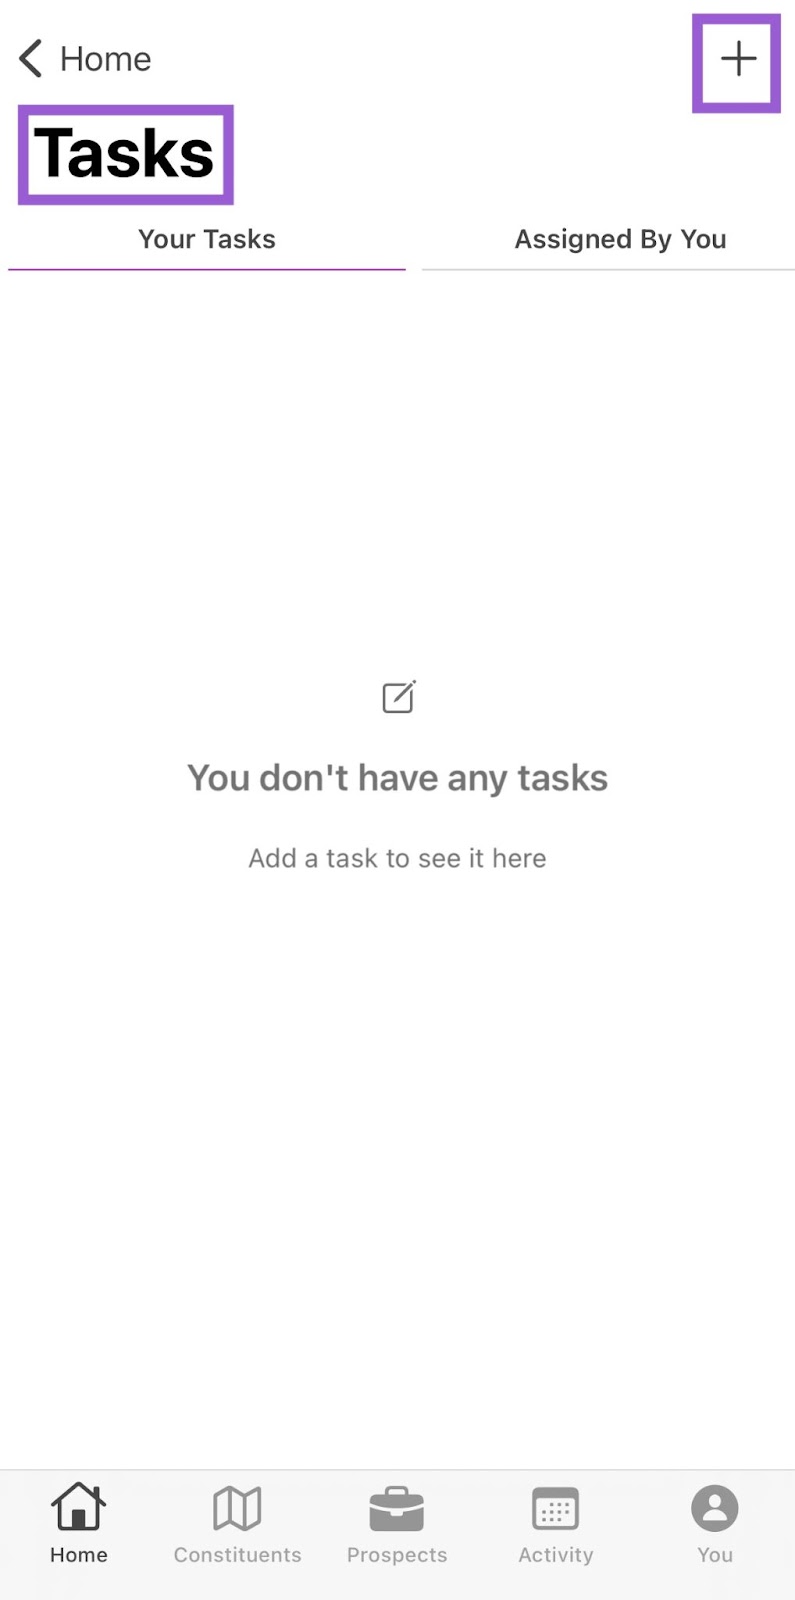
Step 2. Tap the + Button
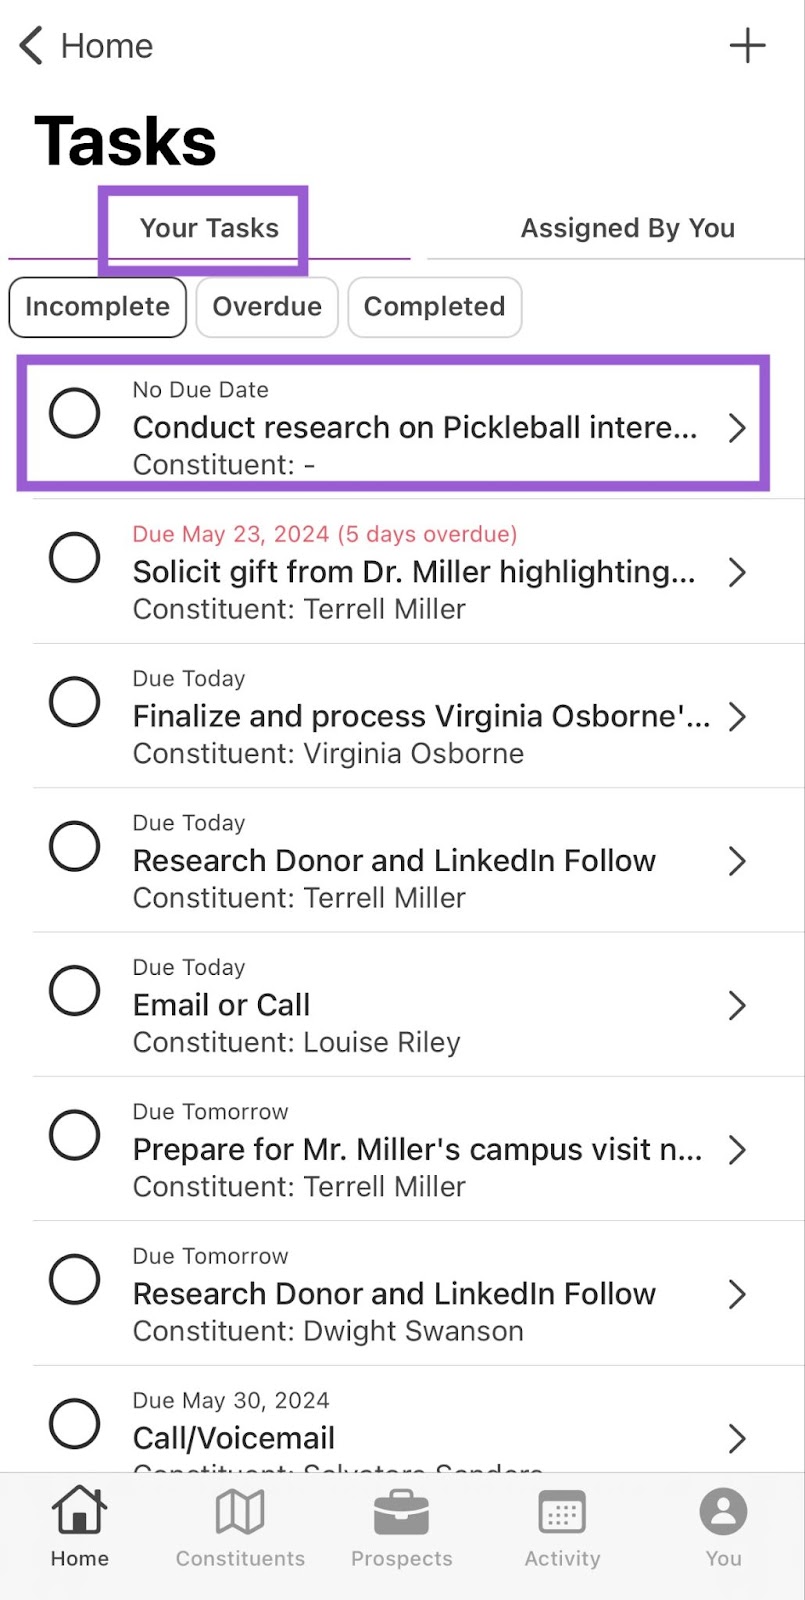
In the Tasks page, you can view both your tasks and tasks assigned by you (we’ll cover these sections in more depth later in this article!). Tap the  button in the upper-right corner to add a new task.
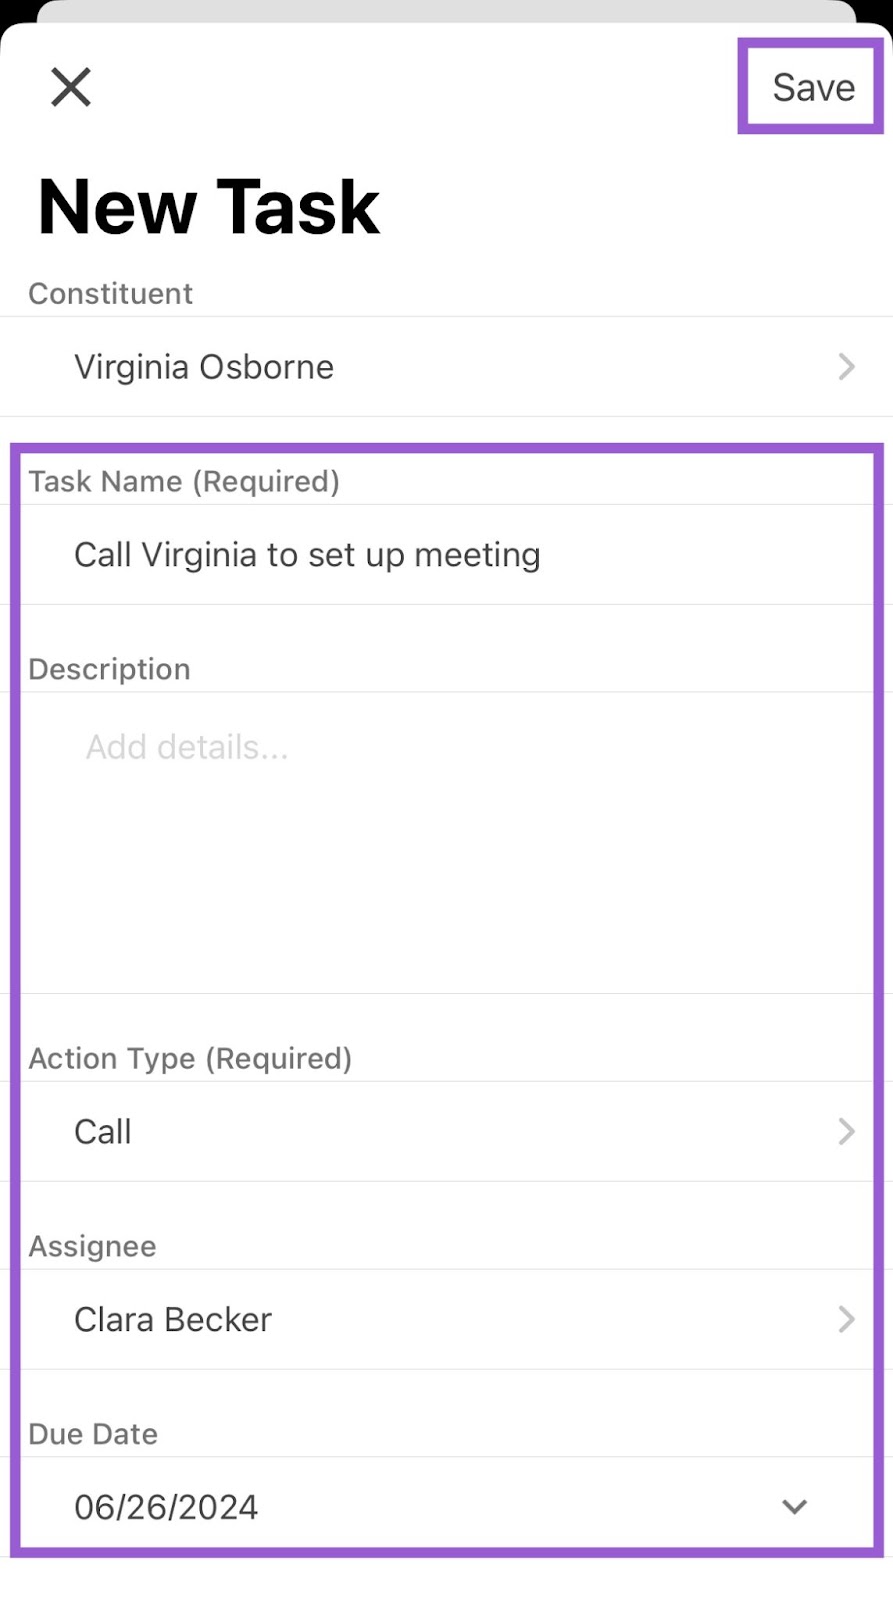
Step 3. Input and Save Task Details
A New Task popup appears where you can enter:
- Constituent: Use this field to link a constituent to the task. Search by name to find and link them.
- Task Name (REQUIRED): Add a name to your task. Titles are limited to 120 characters.
- Description: Add details associated with the task. Descriptions are limited to 250 characters.
- Action Type (REQUIRED): Specify the type of action associated with the task. Choose from Call, Email, Research, Text, Other, LinkedIn, Print Mail (e.g., Pledgemine, other), and ThankView.
- Assignee: Specify who is responsible for completing the task. Please note, your name auto-populates as the task's assignee unless another team member is selected.
- Due Date: Select a due date for the task. Please note, the current date auto-populates as the task’s due date unless removed or changed.
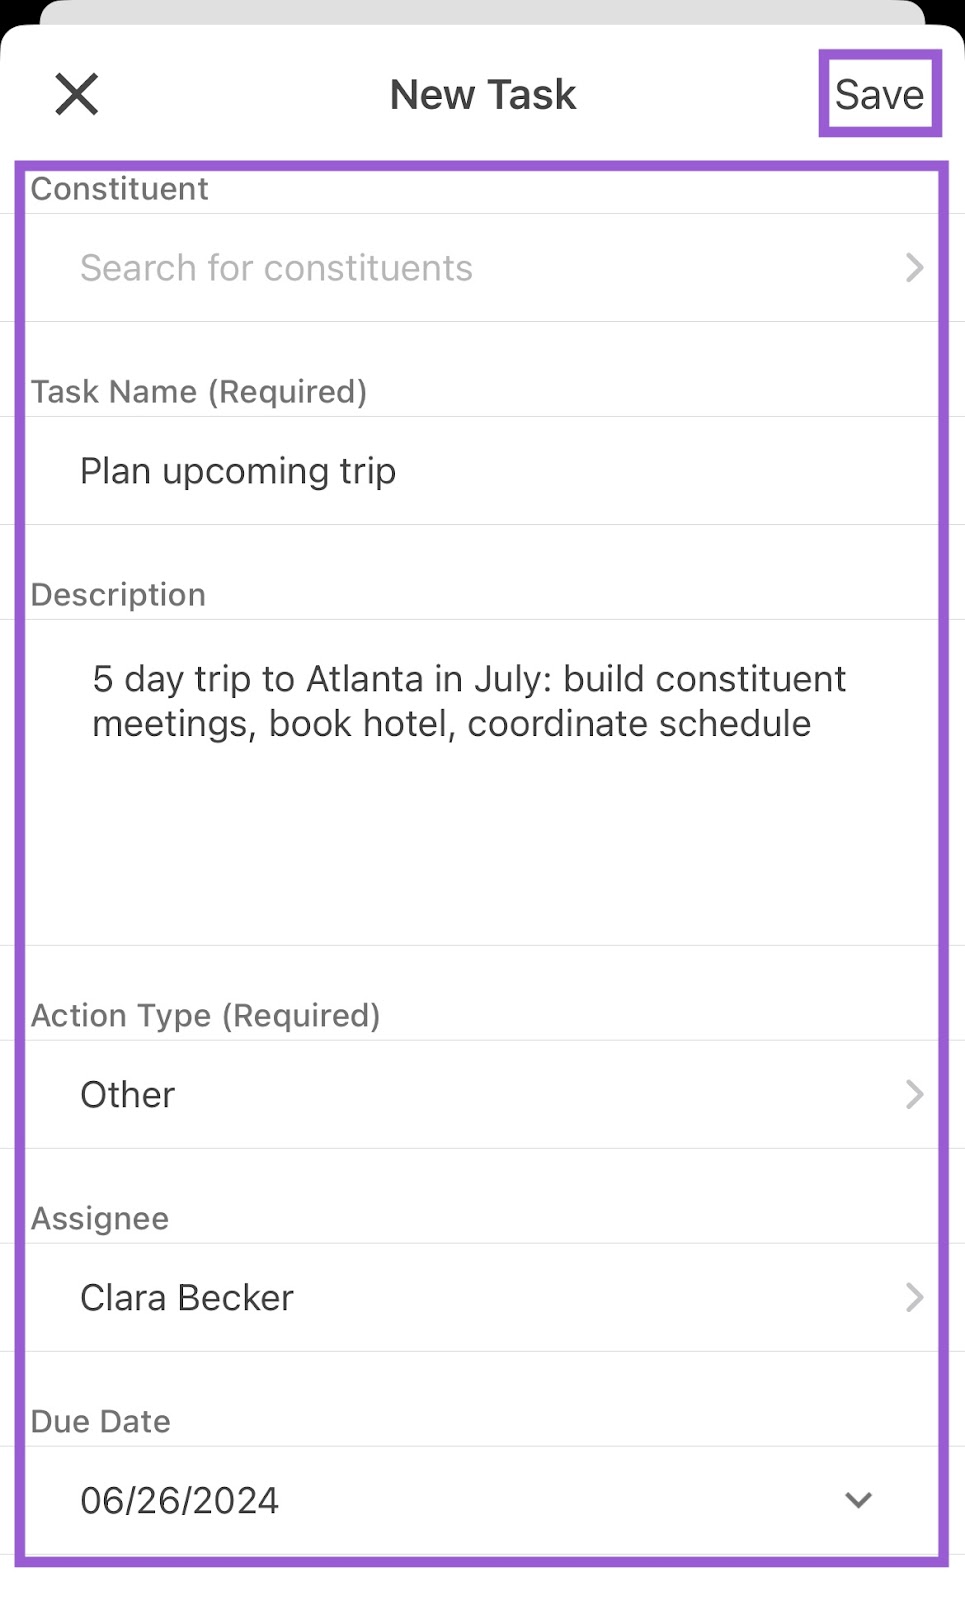
Tap Save to finish adding the task!
Adding Tasks in a Constituent Profile
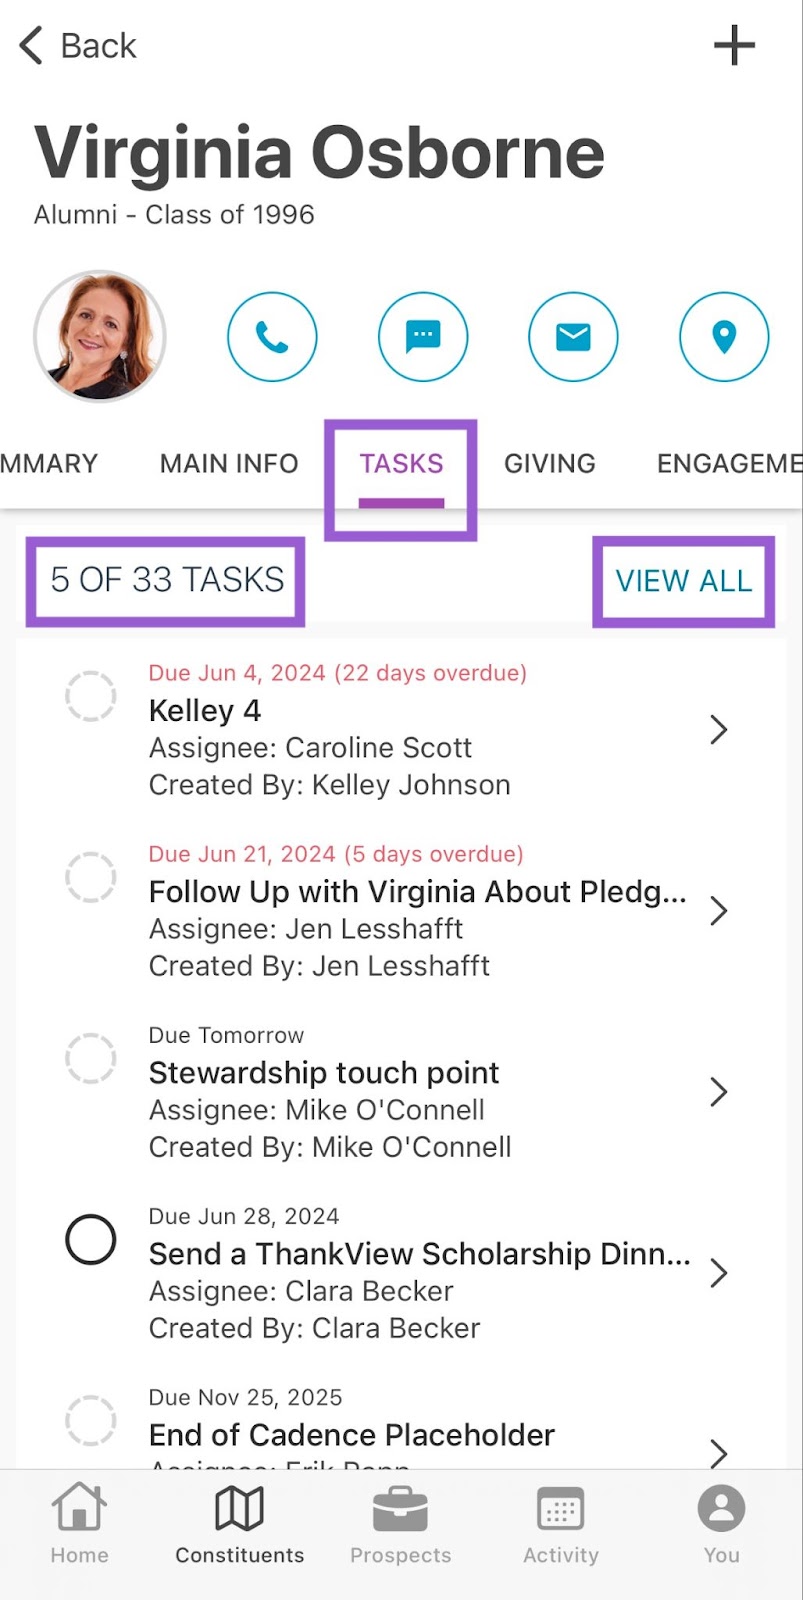
You can also add and assign tasks within individual constituent profiles, each of which has a Tasks tab displaying all tasks linked to the constituent.
Let’s explore how to add tasks from profiles!
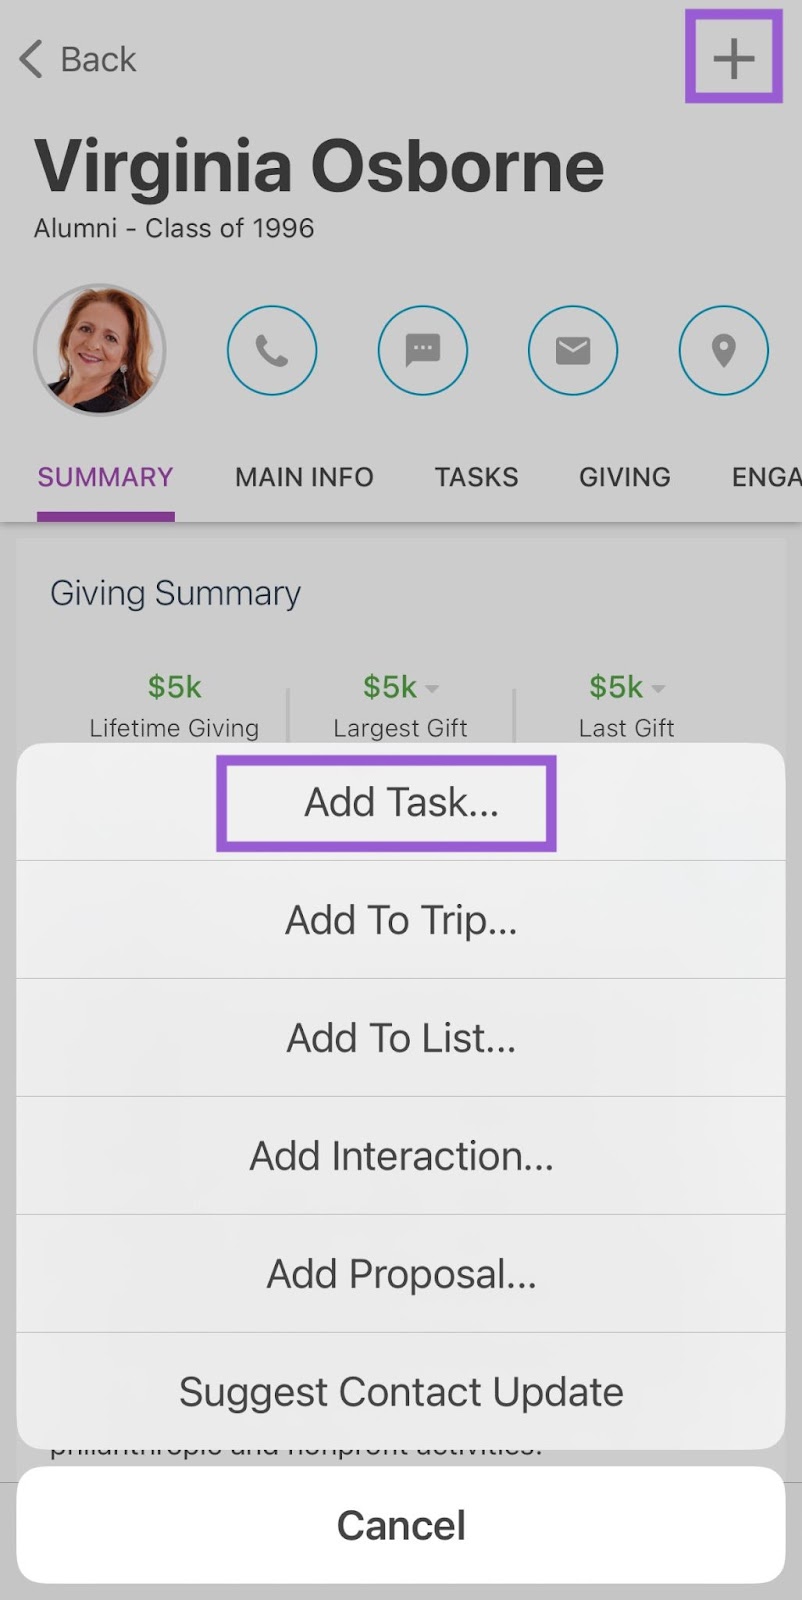
Step 1. Click the Button in a Constituent Profile
In a constituent profile, tap the button in the upper-right corner and select Add Task…. This button is available from any profile tab.
Step 2. Input and Save Task Details
A New Task popup appears, automatically linking the task to the constituent. Enter the necessary details, then tap Save.
Reviewing Added Tasks
You can review created or assigned tasks in a constituent profile’s Tasks tab (if tasks are linked to constituents), your Home tab, or the Tasks page. Below, we’ll take a detailed look at how tasks appear in these locations.
Note:
- Cadence steps also appear wherever you can review tasks. These steps include an icon to the left of their due dates, differentiating them from ad-hoc tasks. Tapping a cadence step shows the constituent’s current cadence and specific step.
- If you’ve paused tasks on the EverTrue web app, a “Your tasks are paused” message appears on your Home tab and Tasks page until the pause ends
Task Details & Organization
Once tasks are added, they include the following details:
- Due Date (if added)
- Task Name
- Linked Constituent (if added, included in the Home tab and Tasks page)
- Assignee/Creator (included in constituent profile Tasks tabs)
Tasks are organized in this order:
- Tasks without due dates appear first
- Task with the earliest upcoming due date appear next
- Overdue tasks are clearly marked next to their due date
Step 1. Navigate to a Constituent Profile’s Tasks Tab
To view tasks linked to a constituent, visit their profile’s Tasks tab. This tab includes both your assigned tasks and those assigned by your teammates.
At the top-left, you’ll find a total task count (including incomplete, overdue, and completed tasks). The tab lists up to five incomplete or overdue tasks—tap View All in the upper-right to see more.
Step 2. Navigate to Your Home Tab
Head to your Home tab’s Tasks Assigned To You section to view up to three of your upcoming tasks. Tap See All in the upper-right corner to access your Tasks page and see the full list.
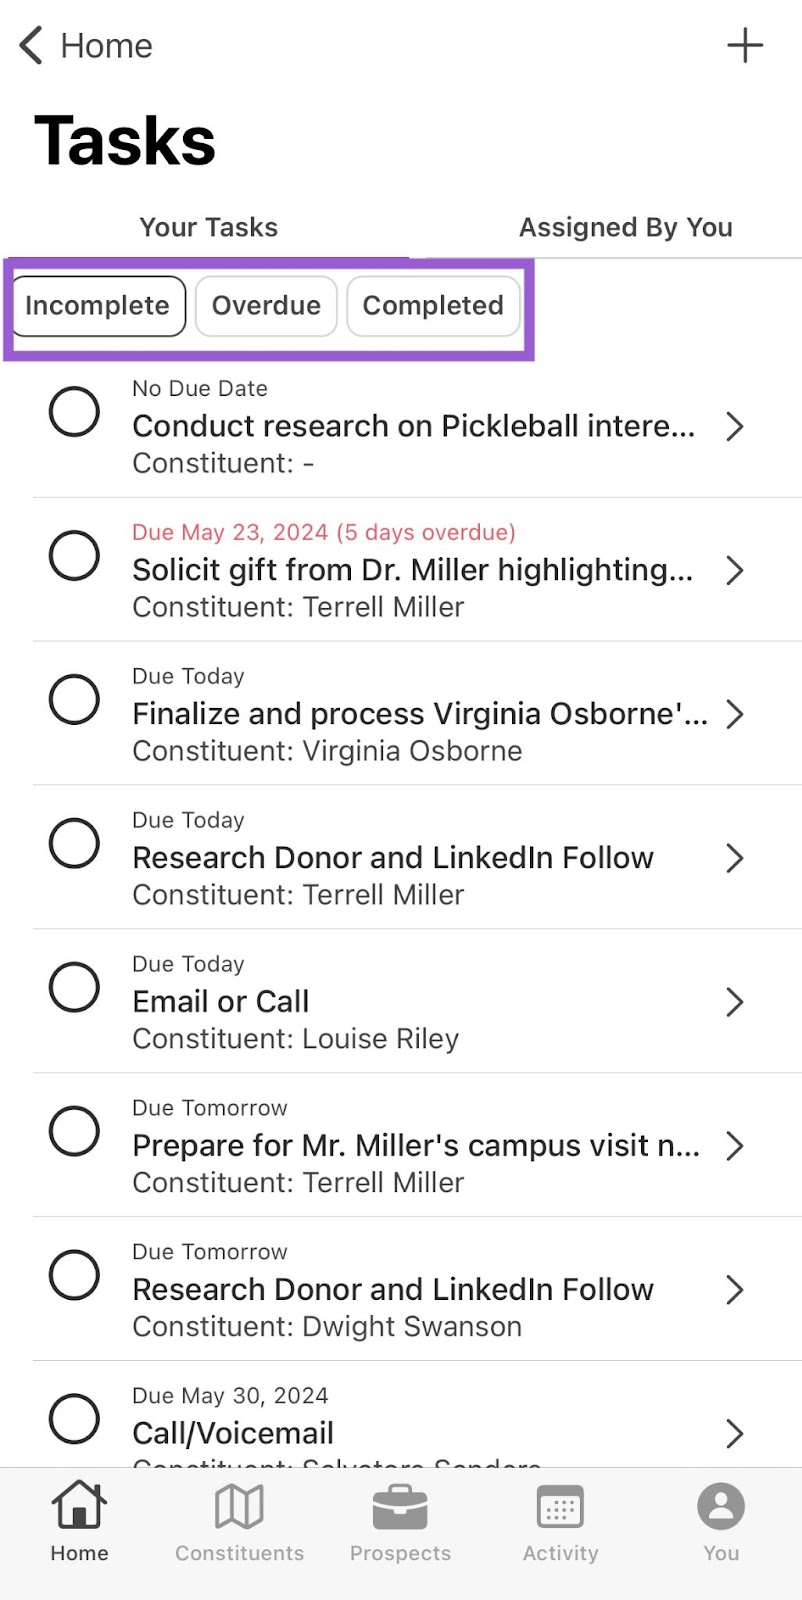
Step 3. View Your Tasks
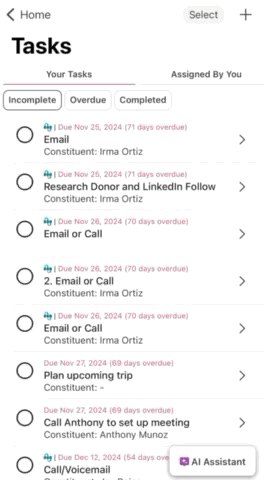
On the Tasks page, the Your Tasks tab displays all tasks assigned to you. Tap a task name to view its full details.
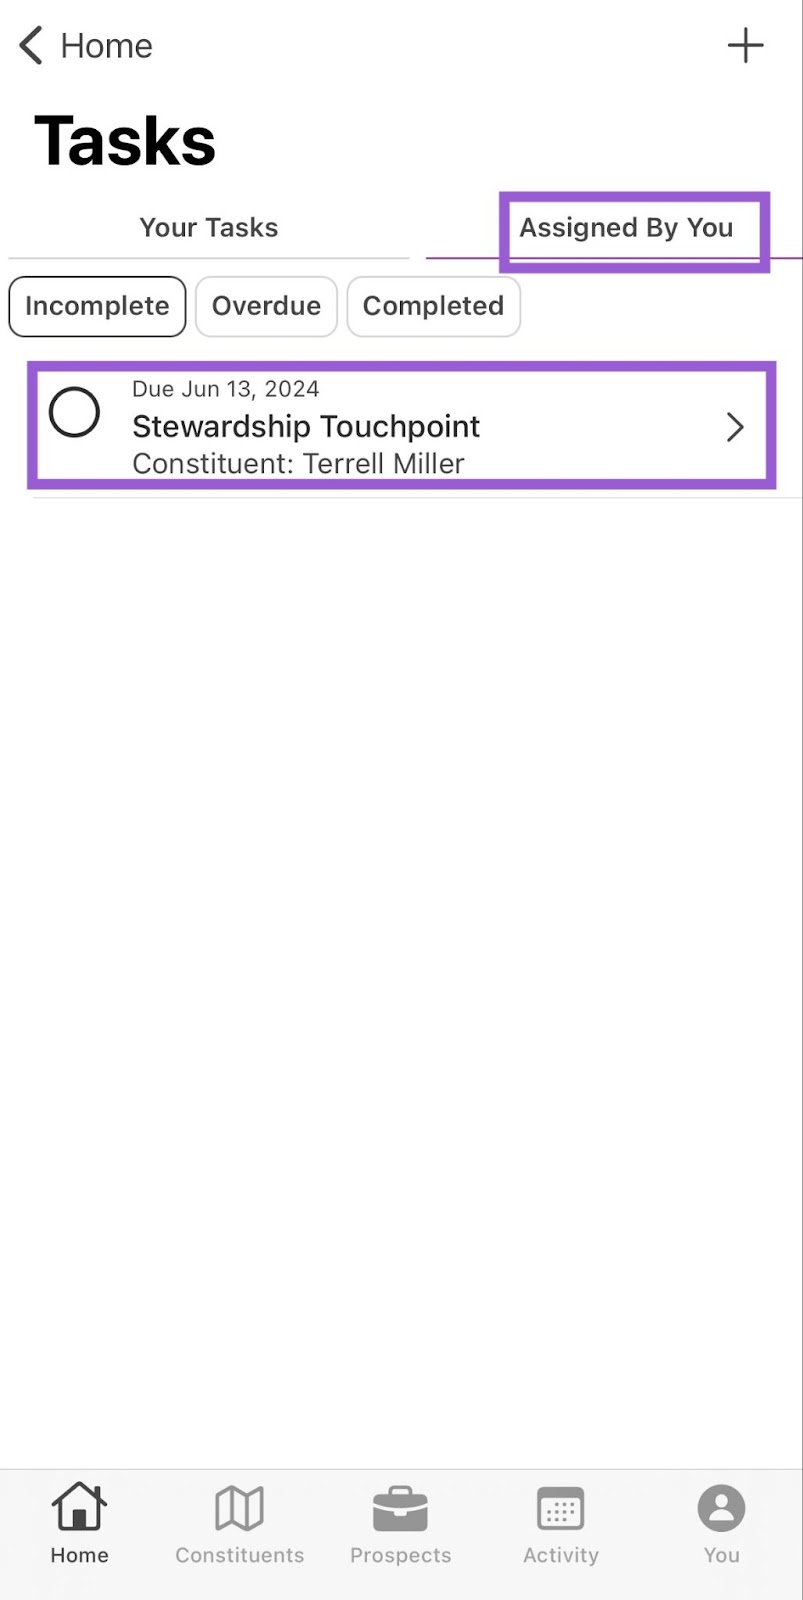
Step 4. View Tasks Assigned by You
To view tasks you assigned to other team members, head to the Assigned By You tab. Tap a a task name to view its full details, including the assignee’s name.
Step 5. Filter Tasks
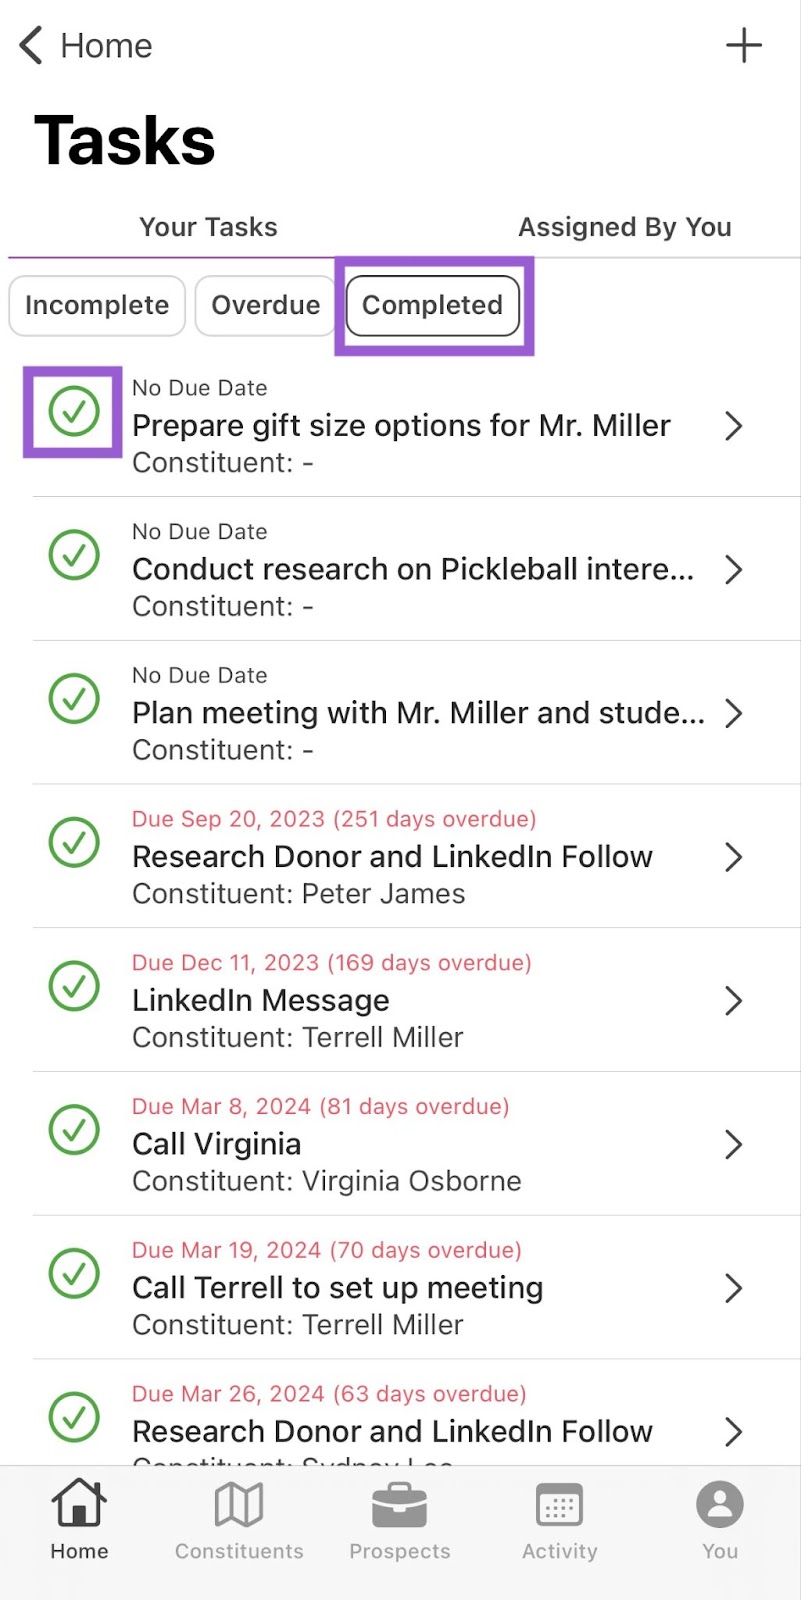
Use the Incomplete, Overdue, and Completed buttons at the top of the Tasks page to filter tasks on either tab by completion status.
Step 6. Mark a Task Complete
To mark a task as complete, simply tap the circle to the left of its name. If you accidentally mark a task complete, filter to Completed tasks and tap the green checkmark paired back to the recently-finished task.
Step 7. Edit or Delete a Task
To edit a task, open it and click the three-dot menu in the top-left of Task Details. Select Edit, make changes, and tap Save.
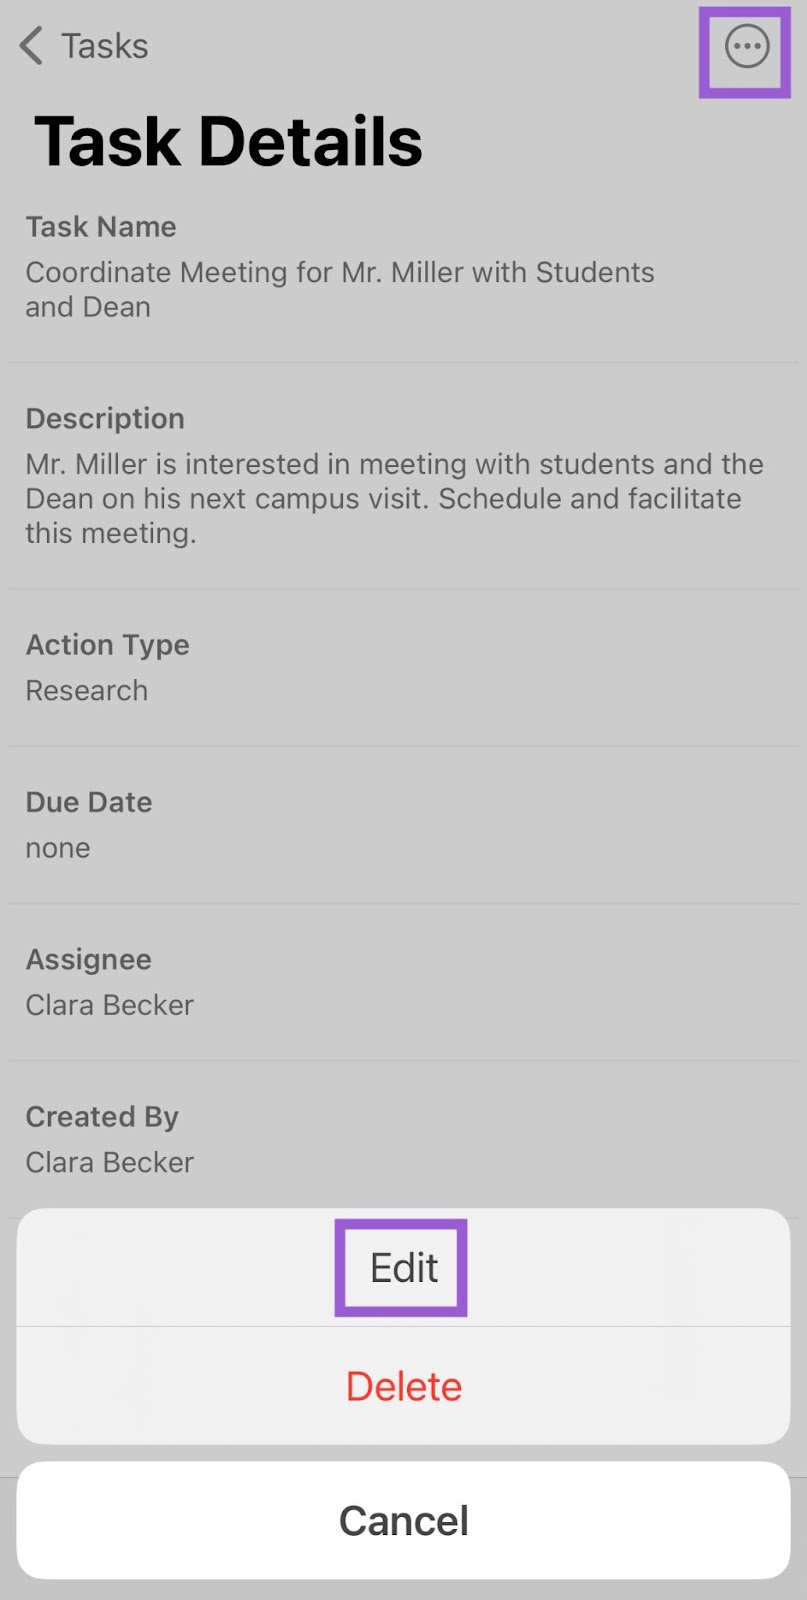
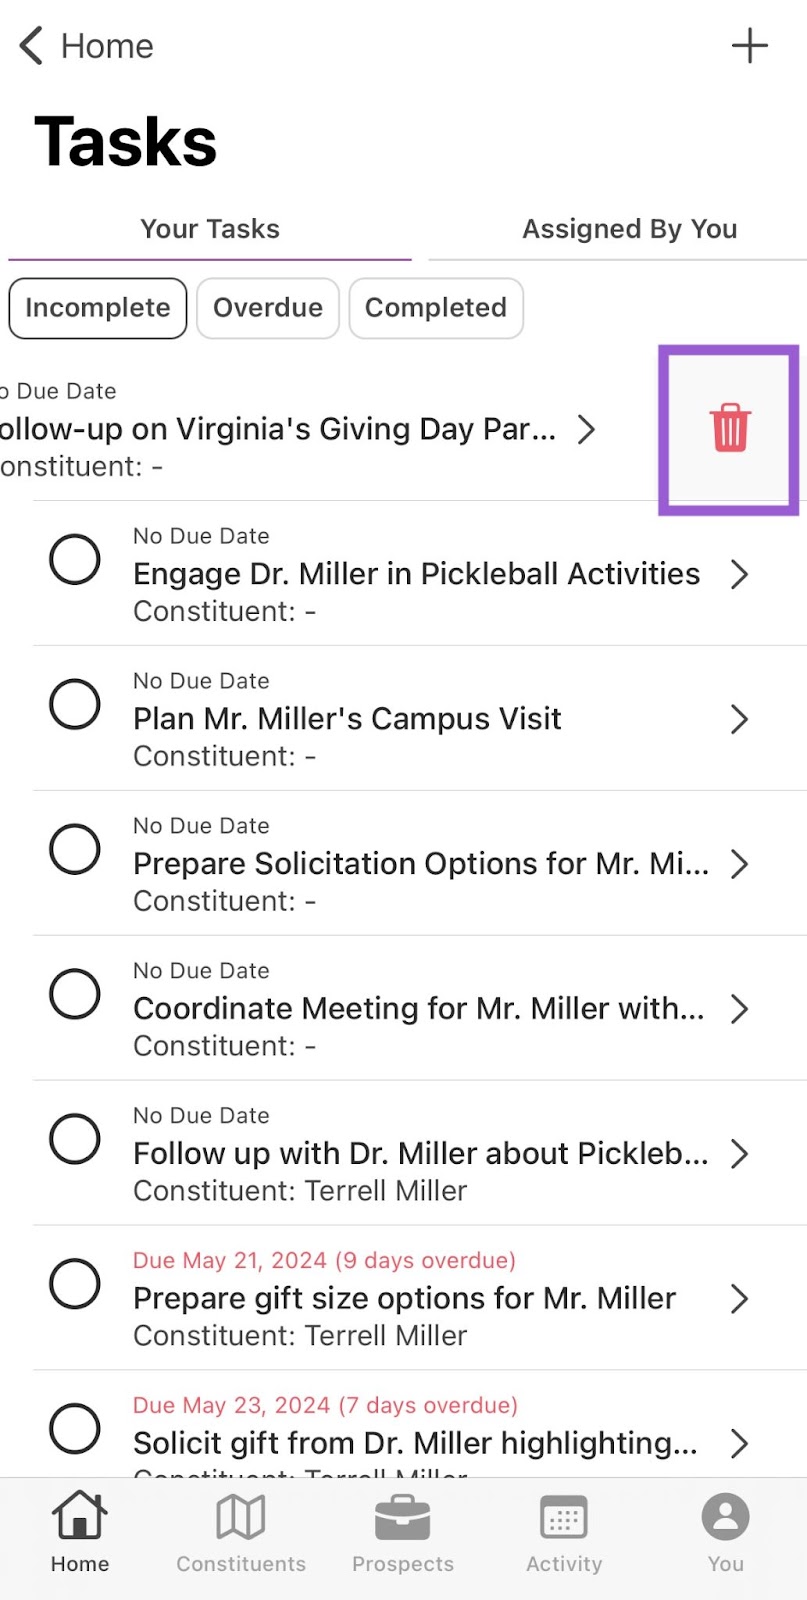
If you need to delete a task, either select Delete from the three-dot menu or swipe left on an unopened task and tap the trashcan button.
Step 8. Take Bulk Action on Tasks
To take the same action on multiple tasks at once, tap Select in the upper-right of the Tasks page. Checkboxes appear to the right of each task. Select the tasks you want to action, then tap the three dot menu at the bottom-right. Depending on the completion status filter applied to the page, you can choose from the following options:
- Mark as Complete
- Mark as Incomplete
- Reassign (Cadence Tasks Excluded)
- Edit Due Date
A confirmation popup summarizes the action you plan to take. Some actions, like Edit Due Date or Reassign, require additional input (e.g., selecting a new date or assignee) before saving. To delete tasks in bulk, tap the trashcan button in the lower-left.
Bulk actions are also available in constituent profile Tasks tabs. After tapping Select, only actionable tasks remain visible.
- Cadence steps cannot be reassigned. If you select only cadence steps, the Reassign option will be disabled. If you select a combination of cadence steps and tasks, only the tasks will be reassigned.
When updating due dates in bulk, you cannot modify multiple steps of the same cadence for the same constituent. This limitation ensures cadence step spacing remains accurate. If you select multiple steps that share a cadence and constituent alongside other tasks or cadence steps that don’t share a cadence and constituent, the bulk due date change will apply only to the tasks and cadence steps that do not share a cadence and constituent.
For any other questions, reach out to EverTrue Support at genius@evertrue.com.
Reply
Content aside
- 2 yrs agoLast active
- 357Views
-
1
Following